파이썬으로 구글 주소록에 저장된 연락처 목록을 조회하는 방법에 대해 알아본다. 이 기능을 구현하려면 구글 계정과 GCP 프로젝트가 필요하다. Google People API를 사용해 구글 주소록 서비스에 접근할 수 있다. 일반적으로 해당 API는 웹/앱 서비스에 통합해 사용자들 각각의 주소록 정보에 접근할 목적으로 사용될 것이다. 다만 내가 구현하고 싶은 기능은 특정 구글 계정을 최초에 한 번 인증해두고, 주기적으로 이 계정의 구글 주소록에서 최신 연락처 목록을 조회하는 것이다. 따라서 이 글에서는 특정 구글 계정의 연락처를 지속적으로 조회할 수 있는 방법에 대해 다룰 것이다.
GCP에서 Google People API 사용 설정하기
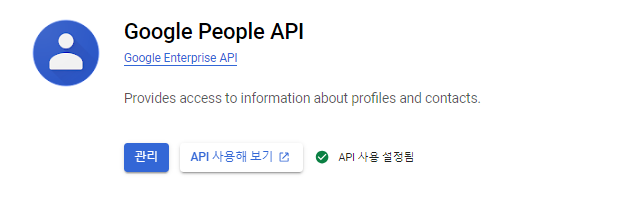
GCP 프로젝트가 없다면 생성하고, 이미 존재한다면 Google People API에 접속해 API 사용 신청한다. 신청을 완료하면 아래와 같이 API 사용 설정된 것을 확인할 수 있다.
OAuth 동의 화면 구성하기
OAuth 동의 화면으로 이동에 접속해 다음과 같이 간단하게 설정한다.
- 앱의 사용자 유형을 선택한 다음 만들기를 클릭
- 앱 등록 양식을 작성한 다음 저장하고 계속하기를 클릭
- 지금은 범위 추가를 건너뛰고 저장하고 계속하기 클릭
- 사용자 유형으로 외부를 선택한 경우 테스트 사용자를 추가
- 테스트 사용자에서 사용자 추가를 클릭합니다.
- 이메일 주소 및 승인된 다른 테스트 사용자를 입력한 다음 저장하고 계속하기를 클릭
설정을 완료했다면, 반드시 게시 상태를 테스트에서 프로덕션 단계로 만들어주어야 정상적으로 동작한다.
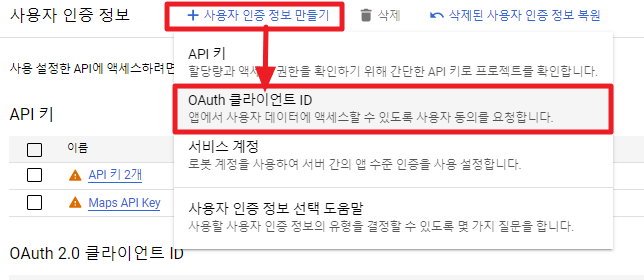
사용자 인증 정보 만들기
사용자 인증 정보에 접속해 새로운 사용자 인증 정보를 만든다.
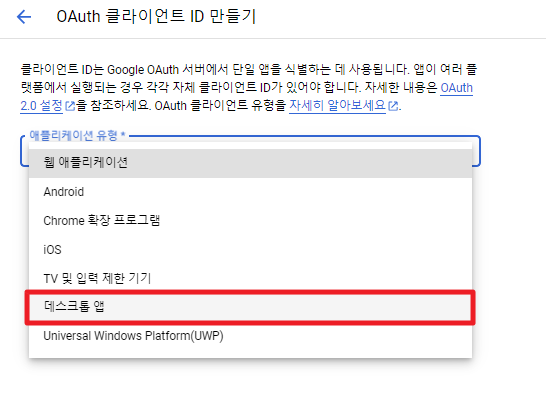
데스크톱 앱을 선택한다.
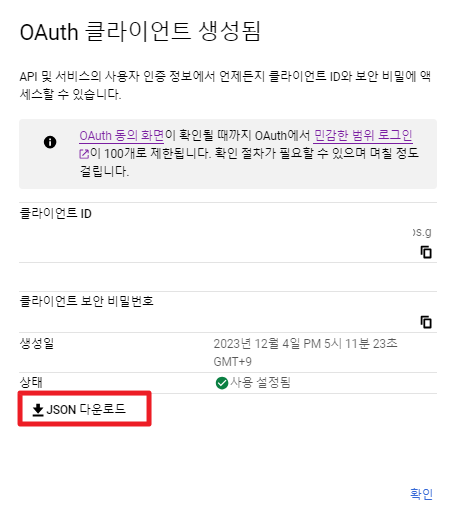
JSON 다운로드를 눌러 인증 정보 파일을 저장해둔다. 적당히 creds.json 과 같이 이름을 바꿔준다.
구글 클라이언트 파이썬 라이브러리 설치하기
이제 구글 클라이언트를 파이썬으로 이용하기 위해 필요한 라이브러리를 실행한다.
pip install --upgrade google-api-python-client google-auth-httplib2 google-auth-oauthlib
파이썬 코드 작성하기
아래와 같이 파이썬 코드를 작성 후 실행한다.
import os.path

from google.auth.transport.requests import Request
from google.oauth2.credentials import Credentials
from google_auth_oauthlib.flow import InstalledAppFlow
from googleapiclient.discovery import build
from googleapiclient.errors import HttpError

# If modifying these scopes, delete the file token.json.
SCOPES = ["https://www.googleapis.com/auth/contacts.readonly"]

def main():
    """Shows basic usage of the People API.
    Prints the name of the first 10 connections.
    """
    creds = None
    # The file token.json stores the user's access and refresh tokens, and is
    # created automatically when the authorization flow completes for the first
    # time.
    if os.path.exists("token.json"):
        creds = Credentials.from_authorized_user_file("token.json", SCOPES)
    # If there are no (valid) credentials available, let the user log in.
    if not creds or not creds.valid:
        if creds and creds.expired and creds.refresh_token:
            creds.refresh(Request())
        else:
            flow = InstalledAppFlow.from_client_secrets_file(
                'creds.json', SCOPES
            )
            creds = flow.run_local_server(port=0)
        # Save the credentials for the next run
        with open("token.json", "w") as token:
            token.write(creds.to_json())

    try:
        service = build("people", "v1", credentials=creds)

        # Call the People API
        print("List 10 connection names")
        results = (
            service.people()
            .connections()
            .list(
                resourceName="people/me",
                pageSize=10,
                personFields="names,emailAddresses",
            )
            .execute()
        )
        connections = results.get("connections", [])

        for person in connections:
            names = person.get("names", [])
            if names:
                name = names[0].get("displayName")
                print(name)
    except HttpError as err:
        print(err)
이제 위에서 정의한 함수를 실행한다. 최초로 실행할 경우 웹 브라우저가 뜰 것이고, 정상적으로 인증한 상태에서 다시 이 함수를 실행하면 주소록 정보가 곧바로 조회될 것이다. 다음 코드를 최초로 실행하면 다음과 같다.
main()
웹 브라우저에서 주소록 접근 동의하기
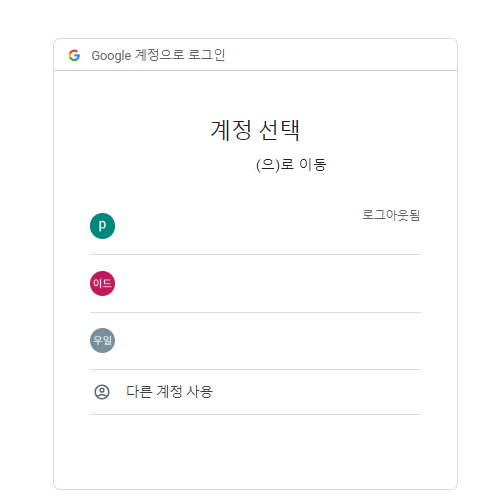
위 함수를 최초 실행하면 아래와 같이 웹 브라우저가 실행되고 구글 로그인 창이 뜬다. 이 때, 연락처를 가져올 구글 계정을 선택한다.
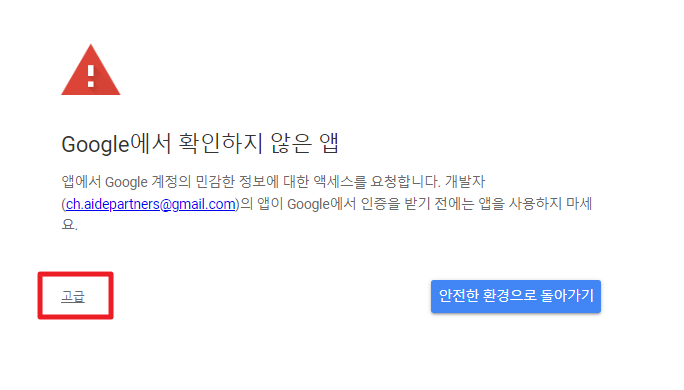
아래와 같이 경고 문구가 뜰 수 있다. 이 경우 고급을 눌러 (안전하지 않음) 링크를 클릭한다.
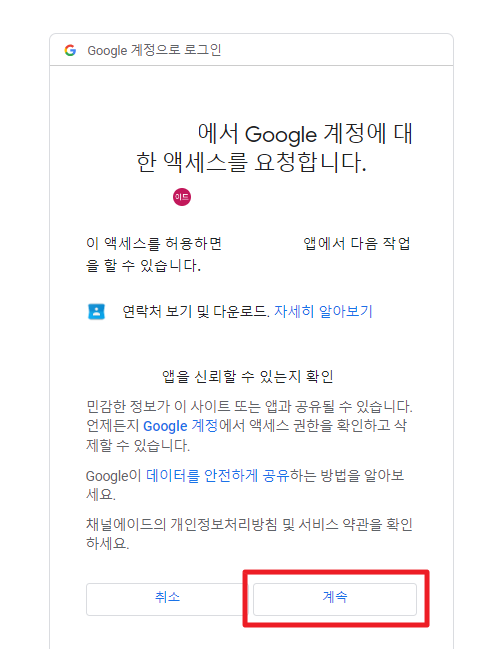
다음 창이 뜨면 계속을 누른다.
아래와 같은 문구가 웹 브라우저에 출력되면 인증이 완료된 것이다.
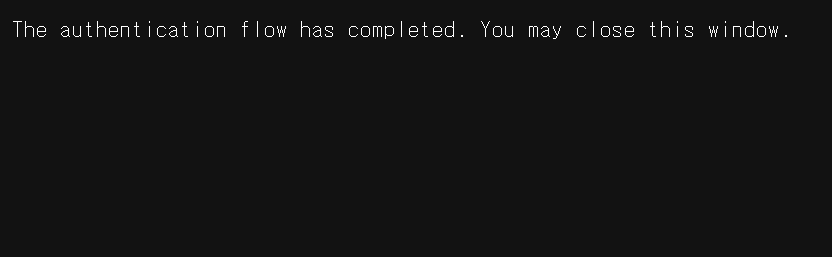
파이썬 환경으로 돌아오면 주소록 정보가 출력된 것을 확인할 수 있다.
저장된 도큰 잘 보관하고 지속적으로 조회하기
파이썬 코드가 실행되는 경로에 token.json 파일이 생성되어 있을 것이다. 이 파일을 그대로 두고 main() 함수를 재실행하면 별도 인증 과정 없이 곧바로 주소록의 연락처 정보가 조회될 것이다. 이 token.json 파일을 잘 보관하여 지속적으로 주소록 정보를 조회하면 된다.
전체 연락처 정보를 판다스 데이터프레임으로 조회하기
위 방법으로 구글 주소록의 연락처 정보를 조회하면 JSON 형식 즉, 파이썬에서는 딕셔너리 형식의 데이터로 조회가 된다. 일부 항목을 보기 좋게 판다스 데이터프레임 형식으로 변환하려면 아래와 같이 수행하면 된다. 우선 전체 데이터를 조회한다.
person_fields_list = [
    'addresses',
    'ageRanges',
    'biographies',
    'birthdays',
    'calendarUrls',
    'clientData',
    'coverPhotos',
    'emailAddresses',
    'events',
    'externalIds',
    'genders',
    'imClients',
    'interests',
    'locales',
    'locations',
    'memberships',
    'metadata',
    'miscKeywords',
    'names',
    'nicknames',
    'occupations',
    'organizations',
    'phoneNumbers',
    'photos',
    'relations',
    'sipAddresses',
    'skills',
    'urls',
    'userDefined',
]

person_fields_str = ",".join(person_fields_list)

SCOPES = ["https://www.googleapis.com/auth/contacts.readonly"]
pageSize = 2000

# 구글 계정의 토큰 값으로 인증 정보 만들기
creds = Credentials.from_authorized_user_file("./token.json", SCOPES)
service = build("people", "v1", credentials=creds)

# 모든 페이지의 연락처 정보 수집하는 함수
def get_all_connections(service, pageSize):
    data = []
    nextPageToken = None

    while True:
        results = service.people().connections().list(
            resourceName='people/me',
            pageSize=pageSize,
            personFields=person_fields_str,
            pageToken=nextPageToken
        ).execute()

        connections = results.get('connections', [])
        data.extend(connections)

        nextPageToken = results.get('nextPageToken', None)
        if not nextPageToken:
            break

    return data

data = get_all_connections(service, pageSize)
print(f"조회 결과 수: {len(data):,}개")
전체 연락처 정보가 data 변수에 딕셔너리 형식으로 저장되는데, 아래와 같이 이 값을 데이터프레임으로 변환할 수 있다.
# 데이터 프레임으로 변환
def create_dataframe(data):
    # 데이터를 추출하고 정리하는 함수
    def extract_info(person):
        name = person.get("names", [{}])[0].get("displayName", "")
        email = person.get("emailAddresses", [{}])[0].get("value", "")
        phone = person.get("phoneNumbers", [{}])[0].get("value", "")
        organization = person.get("organizations", [{}])[0].get("name", "")
        title = person.get("organizations", [{}])[0].get("title", "")
        return {
            "Name": name,
            "Email": email,
            "Phone": phone,
            "Organization": organization,
            "Title": title
        }

    # 데이터 프레임 생성
    df = pd.DataFrame([extract_info(person) for person in data])
    return df

# 데이터 프레임 생성
df = create_dataframe(data)
댓글남기기